Another month, roughly, and I've finished massaging my manuscript into something I'm willing to show to outsiders.  I made two passes during which I:

Completed neglected research
When I write, I use square brackets to indicate a place where I need to look something up.  If I looked things up and did research while I was writing, I'd never finish.  I did do a bunch of research during, but only when I was procrastinating.  I usually had an idea of what I needed to say in the space, but didn't want to take the time to make sure it was precise and completely correct.  Often, my first reader had some idea, and would make a note for me while he was reading.

Made the beginning match the end

As I wrote, I didn't go back and edit previous parts, even when I made changes that caused things closer to the beginning to change.  Instead, I made a note on that day's printout and wrote subsequent days as if the change had always existed.  This way, I didn't get bogged down in recursive edits.  In the end, I think it worked well, since it didn't take too long to fix the problems in the beginning and I know it would have cost me more time doing it the other way.

Edited for consistency

I read the entire thing, beginning to end, making sure that whenever I specified an event in a character's life, all of the references were to the same time.  I read for other problems, too, like the locations of various characters' apartments, etc.  Just a general read for consistency.  Not too many problems here, probably because I caught a lot of them in the previous read-through, for the research.  I also extended the last scene because I'd ended it too abruptly just to be done.

Fact-checked
What it sounds like.  Made sure that if I mentioned a product or a service it could reasonably exist.  When I mentioned real-world products, I double-checked prices, editions, models, years available, etc.

Omitted needless words

This was so interesting that I'm going to post about it separately.

Placed chapter breaks

I planned and wrote the novel in scenes, not chapters, though often I had an idea of where the breaks would go.  Scene A and Scene B needed a chapter break in between, and I wrote it that way.  For other breaks, I wasn't so sure and did it on the fly as I read.  My first reader confirmed that they seemed to be in good places, but he was already familiar with the material.

Formatted like a manuscript

Surprisingly, this was the hardest part.  My novel has numbered chapters divided into parts with location section headings.  It was very hard to find a reference describing how to format those headings.  I eventually came upon Anne Mini's blog, where I asked her questions about formatting.  It seems that #s for blank lines are passe.  And those section headings should be bolded.  Even if this isn't the most correct format, it's unobtrusive.  The format shouldn't annoy anyone enough that they ignore the words.

Now my manuscript is with my second readers (two friends about my age, one male, one female, my mother and one of her female friends, and my grandmother).  I wanted a good range of techno-savvy and ages, and I think I got that.  I'm waiting to hear what they think of the plot and characters and whatever grammar problems or typos there may be.

Waiting is hard, so I'm plotting the second book in the series.
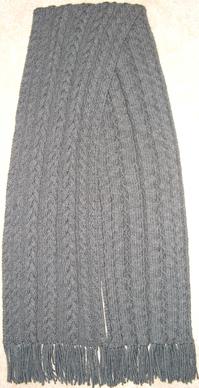
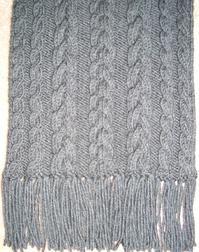
Cable Scarf Front and Back.JPGAfter I admired it, a friend of my SO's family gave me a lovely crocheted large doily (or small tablecloth) for a round side table. 

It's a pretty piece, though not something that has a place in our house, given our current decor.  In return, I wanted to give her something handmade.  Since she's not a knitter, I wanted to knit something for her.

I bought some cotton yarn to make potholders, but that didn't end well.  They were too stiff and the cream, beige, and green of the yarn didn't show off the knitting to the extent I wanted.  The potholders were too simple and just not worthy of her.  I gave up on them and I'll repurpose the yarn into some thing else later.

In the local yarn store, I saw a dark grey superwash (non-felting) Merino wool in the same brand I'd used before to knit a scarf in red.  I ordinarily wouldn't make something out of wool for a gift, but this wool is machine washable which makes me feel a little better about it.  Also, my SO assured me that the recipient of this particular gift would have no problem hand-washing a scarf if she needed to.

The finished product is about 6 1/2" wide and 57" long, excluding 3" of fringe on either end.  I usually don't add fringe to scarves since it gets ratty and messy pretty easily, but the edge of this scarf needed it to visually smooth out the wavy edges of the cables.  It took me about an hour to add the fringe and I think the result is well worth the time.  If (when) I make this scarf again, I'll add a couple of rows of crochet to the short edges to further smooth the transition between the cables and the fringe.

I'm quite pleased with the way it came out and I hope she enjoys it.

Note to self: never admire anything aloud.
Detail of Knitted Cables.JPG
Materials:
5 - 50g (1.75oz.) skeins Zara Merino yarn (gray - color 1468)
size 4 (3.5 mm) knitting needles
size E (3.5 mm) crochet hook for easy bind off and fringe application (optional)
1 skein of yarn for fringe (optional)

Stitches:

C4(6)B = Slip next 2(3) sts onto cable needle and hold at back of work, K2(3), then K2(3) from cable needle.
C4(6)F = Slip next 2(3) sts onto cable needle and hold at front of work, K2(3), then K2(3) from cable needle.
 
Instructions:
Cast on 70 sts.
Row 1 (Right Side): P2, K4, P3, K4, P4, K9, P5, K8, P5, K9, P4, K4, P3, K4, P2.
Row 2 and all even rows: K2, P4, K3, P4, K4, P9, K5, P8, K5, P9, K4, P4, K3, P4, K2.
Row 3: P2, K4, P3, K4, P4, C6F, K3, P5, K8, P5, C6F, K3, P4, K4, P3, K4, P2.
Row 5: P2, C4F, P3, C4F, P4, K9, P5, C4F, C4B, P5, K9, P4, C4B, P3, C4B, P2.
Row 7: P2, K4, P3, K4, P4, K3, C6B, K3, P5, K8, P5, K3, C6B, P4, K4, P3, K4, P2.
Row 9: Repeat Row 1.
Row 11: P2, C4F, P3, C4F, P4, C6F, K3, P5, C4F, C4B, P5, C6F, K3, P4, C4B, P3, C4B, P2.
Row 13: Repeat Row 1.
Row 15: Repeat Row 7.
Row 17: Repeat Row 5.
Row 19: Repeat Row 3.
Row 21: Repeat Row 1.
Row 23: P2, C4F, P3, C4F, P4, K3, C6B, P5, C4F, C4B, P5, K3, C6B, P4, C4B, P3, C4B, P2.
Row 24: Repeat Row 2.
Repeat Rows 1-24 until approximately 57" from beginning (or your desired length).

Finishing:
Bind off. 
Weave in all ends. 
Optional fringe:
  • Wrap the yarn around a piece of sturdy cardboard cut to the desired finished length of your fringe.  (Don't wrap too tightly, as the suggested yarn will stretch.)
  • Cut along one edge of the cardboard to yield pieces twice the length of your cardboard's width.
  • Starting at a corner of the short end of the scarf, insert the crochet hook from back to front.
  • Fold two strands of your fringe yarn in half and pull the loops through the scarf.
  • Insert the ends of the fringe yarn through the loops (forming a lark's head knot) and pull tight.
  • Repeat for every other stitch along both short ends of the scarf.
The free pattern above is for your personal use only.
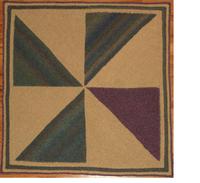
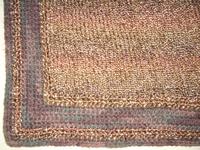
Knitted Pinwheel Quilt Blanket.JPGThis blanket came about as part of my Stash Zero initiative. 

I wanted to make something very simple that I could work on when I was out of the house, and I didn't want to have to make a gauge swatch for this project.

My goal was to use color in a way that made it look more than just basic squares sewn together.  My SO's mother is a quilter, so I was thinking of her art and toying with various quilt-inspired block designs.

I knew I wanted to knit it, but I didn't want to have to do too much counting.  Also, since I was trying to use up stash yarn, I was restricted to what I had on hand.  I ended up with a design based on a simple pinwheel block, with one of the pattern triangles a different color, to add visual interest. 

The beige is the background color, and it was a deliberate decision to have the beige triangles (instead of the colored, pattern triangles) meet in the middle.  It meant that if anything shifted a little when I sewed it together, it wouldn't be as noticeable than if the green and purple points didn't meet exactly right.

Each square was machine knitted in garter stitch (knit every row) from one corner, starting with the beige.  I cast on one stitch and increased at the end of each row for 100 rows (until there were 100 stitches on the needle), then worked one row even and changed to the pattern color.  In the pattern color, I decreased at the end of each row by knitting two together through the back loops at the end of every row until there are two stitches left on the needle, then bound off.

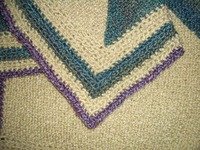
The single-crochet border's design was based on tying the purple in to the whole.  Without the purple edge of the border, the purple triangle wouldn't look as if it belonged there.  The green stripe in the border was so I could use up as much green as possible.  That's also what determined the thickness of the beige stripes in the border.  It came out looking exactly right, I'm thrilled to say.  I especially like that the heft and weight of the crocheted border match that of the garter-stitched body of the blanket.
Detail of Quilt Inspired Baby Blanket.jpg
The detail picture to the right represents the colors of the yarn much better than the one above of the whole blanket.

This blanket is large (48" square, including the 3 1/2" border) and thick for a baby blanket, but I'm sure I'll find some use for it when it's time.  I'm definitely keeping this one for me.  It came out better than I thought it would and I'm completely happy with it.  That's rare, so I'm enjoying it.  And in what may be a first for me:

No new yarn was purchased to complete this project!

Materials:

  • Lion Brand Homespun Yarn
    • 4 skeins 393 Cream (Color A)
    • 3 skeins 320 Regency (Color B) - green
    • 1 skein 322 Baroque (Color C) - purple
  • No. 10 knitting needles (6.0 mm)
  • K crochet hook (6.50 mm)
  • blunt yarn needle
  • stitch markers (optional)
Squares:
Using knitting needles and Color A, cast on 1 st.
Increase by k into front and back of last (only) stitch in row.
k1, increase.
k2, increase.
k 100 rows, increasing 1 at the end of every row.
Knit one row even, then change to Color B.
k 98 with Color B, decrease by k2tog into back loops of last two stitches.
k 97, decrease.
k 96, decrease.
When 2 sts are left on needle, bind off knitwise.

Assembly:
Make three squares with Colors A and B.
Make one square with Colors A and C.
Sew squares together in pattern. 
Weave in ends at center point.

Edging:
With crochet hook, join Color A anywhere along edge on right side of work.
Round 1 (right side): sc once into edge for every two knitted rows.  3 sc into each corner.  (Optional: put marker between first and second stitch of corner.)  Join with sl st. Turn.
Round 2 (wrong side): sc in each sc.  3 sc in each corner.  Join with sl st.  Turn.
Round 3 (rs): Same as Round 2.
Round 4 (ws): Same as Round 2.
Round 5 (rs): sc in each sc.  3 sc in each corner.  Join with sl st.  Change to Color B.  Don't turn.
Round 6 (rs): Same as Round 2.
Round 7 (ws): Same as Round 2.
Round 8 (rs): Same as Round 2.
Round 9 (ws): sc in each sc.  3 sc in each corner.  Join with sl st.  Change to Color A.  Turn.
Round 10 (rs): Same as Round 2.
Round 11 (ws): Same as Round 2.
Round 12 (rs): sc in each sc.  3 sc in each corner.  Join with sl st.  Change to Color C.  Don't turn.
Round 13 (rs): sc in each sc.  3 sc in each corner.  Join with sl st.    Don't turn.
Round 14 (rs): Same as Round 2.  Bind off and weave in all ends.

The free pattern above is for your personal use only.

Now With More Crafts

| 2 Comments | No TrackBacks
Well, I was wrong.

You'll now find articles and tutorials about various crafts (including but not limited to: knitting, crocheting, jewelry-making, sewing, 1:6 and 1:4 doll handicrafts, and 1:12 miniatures) on this site.

I've decided to merge them from their former home, since I wasn't updating either place nearly enough.  Maybe with just one site to keep track of, I'll be able to add to it more frequently.

Eventually, I hope to have different entry portals stressing the different parts of this site, so a knitter/crocheter need never see the sewing entries and someone interested in 1:12 miniatures won't be bothered with the entries about computer games.  This is a plan for the (far) future, so there'll still be some wading through to get to the content you're most interested in.

If, by some chance, you're interested in every topic posted here, contact me so we can be friends as we clearly have a lot in common.

Unfortunately, comments on the crafting articles were lost during the move.  I apologize to those wonderful people who'd offered their kudos, tips, and experiences.  I hope you'll not be afraid to comment going forward, as this is the permanent home of these articles.

The Hate Blanket

| No Comments | No TrackBacks
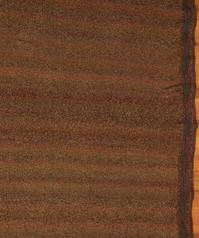
The Hate Banket.JPGFor almost a year, my SO's bugged me to knit matching couch blankets using yarns he picked.  A year after we ordered the yarn for them (so we could get enough of the same dye lot), the first one is done.

Even though I consulted extensively with him before and during its production, he still thinks it's about 18" too short and 5" too narrow.  So we don't have enough yarn for the second one, even if it's exactly the same size as the first one.

I've been casually calling it the "Hate Blanket".  For some reason, this seems to upset him.

More on the second one when I can gird my loins enough to tackle it.  I'm sure that whatever I do, it won't be right.  There will be no third matching couch blanket.

The one thing these blankets have going for them is that they're considerably reducing the amount of yarn I have waiting to be made into stuff.  I'm not claiming these for my Stash Zero initiative since the yarn was specially purchased for this purpose, but I'm glad to see less yarn in my yarn-storage disaster area.

Okay, I do like the way the yarn banded in the body of the blanket.  I should have straightened it out more before I took the picture, but see above re: Hate Blanket.  Besides, I'll have another chance to take a good picture when I finish the (sigh) second one.
Hate Blanket Detail.JPG
The 100-needle bed that comes with the knitting machine is good for baby blankets, but not much more.  Over the years, I've added two Ultimate Sweater Machines (USMs) and a couple of extension beds (mostly for the spare needles) to my original Incredible Sweater Machine (ISM).  For this project, I use two USM beds joined together, filled in with spare needles where they meet, but it's much longer than I need.  You could do this project with an USM and 2 20-needle extension beds.

The Hate Blanket measures 40" by 64", including the 3" crocheted border.  Knitting the body of the blanket on the machine took me the better part of a day, most of it spent unknotting snarls on the needles.  This kind of yarn is a little too loopy and fluffy to get consistent machine-knitting results with it.  The border took about five evenings to crochet.

Materials:
7 - 6 oz (170 g) skeins of Lion Brand Homespun yarn in Barley (381) -- Yarn A
3 - 2 1/2 oz (70 g) skeins of Lion Brand Wool-Ease in Wood (232) -- Yarn B
Incredible/Ultimate Sweater Machine (I/USM) with a 140-needle bed
I/USM accessories (weighted hem, carriage, optional row counter, etc.)
size K (6.5 mm) crochet hook
blunt yarn needle
stitch markers (optional)

Body:
  • Set up your I/USM according to its directions.
  • Cast on to 140 needles with Yarn A using your preferred method--don't forget the weighted hem.  (I use the closed loop method.)
  • Knit even using six skeins of Yarn A.  You'll get about 58-64 rows per skein.  Make sure to leave enough free yarn at the beginning and end of each skein to weave in securely later.
  • Cast off using your preferred method.  (I used the yarn needle and the x method.)
  • Weave in all ends.  (You can hide some of the ends by crocheting the border over them.)
Border:
With the crochet hook, join Yarn A to the edge of the knitted body.
Round 1 (rs): On long sides, 3 sc into every 4 knitted rows.  On short sides, sc into every stitch.  3 sc into each corner.  (Optional: put marker between first and second stitch of corner.)  Join with sl st. Turn.
Round 2 (ws): Crochet around edge, as in Round 1.  Join with a sl st, using Yarn B.  Turn.
Round 3-7: Crochet around edge, as in Round 1.
Round 8 (ws). Crochet around edge, as in Round 1.  Join with sl st, using Yarn A.  Turn.
Round 9-10: Crochet around edge, as in Round 1.
Round 11 (rs): Crochet around edge, as in Round 1.  Join with sl st, using Yarn A.  Don't turn.
Round 12 (rs): Crochet around edge, as in Round 1.  Don't turn.
Round 13 (rs): Crochet around edge, as in Round 1.  Bind off and weave in all ends.

The pattern above results in an edge which is 2 rows A, 6 rows B, 3 rows A, 2 rows B.

Alternatively, you could do 2 rows A, 6 rows B, 4 rows A, 3 rows B.  This would eliminate the double right side rows, but all rows using the new yarn will start on the right side for pretty joins.  It'll result in a slightly thicker edge.  I plan to do it this way on the next blanket like this I make.

The free pattern above is for your personal use only.

Hinterland

| No Comments | No TrackBacks
I love PC game developer Tilted Mill.  Their games (most notably Children of the Nile: Immortal Cities) have amazing concepts, though the execution is often flawed in some way.  There's plenty of playable life in these games, though not as much as the concepts would suggest.  Tilted Mill is also very supportive of their games after release.  For instance, their SimCity: Civilizations was very broken out of the box, but they patched it for free until it almost resembled a game.  That title is the least successful of their games, possibly because it was entangled with the SimCity brand, so they didn't have full control over its direction.

On the heels of re-acquiring the rights to Children of the Nile (and releasing an expansion pack for it), they've released a new single-player RPG, Hinterland.  Unfortunately, the game was only available through Steam, something I'd avoided until then, but for Tilted Mill, I signed up.  At $20, Hinterland was a steal, especially because of who developed it.  Hinterland came out on September 30th and by October 10th, they'd already released the first free content pack.

In Hinterland, you play a noble who has to pacify a small region of the countryside and build a village.  The twist is that your citizens double as your party members (up to three + you).  If you take the farmer out to hunt monsters, he's not producing food.  The hammer-wielding smith in your party isn't back in the village making stuff.  Et cetera.

It's a very interesting concept, capably realized.  There's also a lot of room for expansion. 

First, the problems:
  • You can't scroll out.  This is the deal-breaker.  I'm used to a wider field of vision for these "run around and kill things" games.  Enemies shoot (magic and arrows) at you from off-screen.  You can't effectively play an archer, since you can't take advantage of the full range of your weapon.  I end up playing with the region map open so I can see where I'm going, but it takes up a lot of the screen and I often get hung up on scenery.  The lack of higher view levels makes the game even smaller that it needs to be: claustrophobic and sad.
  • No auto-attack for your main character.  Sometimes, in the heat of battle, it's hard to click on the enemies' attack spots, which seems pretty small.  I'm my character isn't walking or running, but is taking damage, it should automatically attack whatever's hurting it.  Some people don't like this.  I get it.  Let them turn it off.  Or let us turn it on.  I think more people would like this than wouldn't.  (Though, probably not from the subset of beta-testers and people who post on the forums.)
  • The town's borders are too close to the outermost buildings.  You can set your followers in town to defend it when the enemy raids.  (Though you have to click on each follower individually to do this.)  If you have high-enough level followers, armed and armored well enough, they can sometimes survive the raid without your main character (and party).  Besides the townspeople's AI not being too good, enemy spellcasters and archers can stand beyond the town limits and shoot into town.  Since the enemies are outside of the limits, the townspeople won't react as if it's a raid (by fighting or running away).  Instead, they'll stand there and get killed.  It's very, very annoying.
  • Followers' character cards overlap, hiding their class and/or level.  The buzz on the forums seems to indicate only people playing at the widescreen resolutions have this problem.  I play at 1920x1200.  'Nuff said.
Now, the awesomeness:
  • The concept.  Hinterland is a quick game, especially if you play a small map.  There's the rush of hiring your first followers (a couple at a time visit the town, more if you have a hostel) and the strategy of deciding who to take with you into the wilderness.  There's no campaign, no ongoing story, just this match.  I always play on Hardcore (permadeath for your main character, resulting in a loss) to up the stakes.
  • The humor.  Tilted Mill included some hilarity in the game.  For instance, the character portrait of the female goblin is just the male portrait with lipstick and a wig.  The game doesn't take itself too seriously and encourages you to follow suit.  Sure, you died to a bunch of dire wolves and there's no saved game.  Just fire it up and try your luck again.
  • Followers in town auto-equip.  This was included in the first patch.  The cynical part of me thinks Tilted Mill held it back so they could appear to respond quickly to player demand.  What probably happened is that they were working on it, but knew it would take another couple of weeks.  The game shipped a little late and they didn't want to delay it any more.  Either way, it's cool.  This was a necessary addition to the game and now all players will have it.
  • Tilted Mill's commitment to the game.  It's very clear from the forums that the developer is deeply invested in this game.  They've quickly corrected some issues (like early minimap troubles at widescreen resolutions) and offered players fixes and additions free of charge, only a couple of which seemed like they should have been included in the first release of the game (see above).  I believe they enjoy working on Hinterland and delighting and amazing us with more of it
I've had way more than $20 of fun out of this game and I look forward to future patches and expansions (including those that I'll pay for).  I hope the lack of scroll out isn't due to some basic property of the Torque engine, but is instead something that's relatively easy to fix.  If they do that, I'm with them for the duration.

In short, this is Tilted Mill's usual: fun and flawed.
More from my recent playscale doll kick.  Stop reading now if it's not your bag. 

I subtitled this entry, because I needed it to sound important and profound to camoflauge my faint embarassment at writing about this subject.  I think I made it sound like a straight-to-video horror movie.  I'm not sure if I succeeded in my objective.  Well, onwards and upwards.

In the '80s, Mattel figured out that some adult collectors buy Barbie dolls for themselves, intending to keep them for display purposes.  Never a company to forgo profit, they came out with lines of more intricate dolls with better materials in their dresses.  Some were designed head-to-toe by real-world fashion designers like Bob Mackie.  He actually designed my favorite face mold, now used in some playline dolls, the closed-mouth (and aptly-named) Mackie mold.  Back to the story.

The dolls were successful because people snapped them up, even though some ran to the hundreds of dollars, new.  Resale has been spotty, from what I can glean, which is no big surprise.  Even putting aside the effect of hundreds of pairs of dead Barbie eyes in one room, a collection of nothing but boxed dolls, pinned to their cardboard backing and staring out forever through a window of dusty cellophane induces its own inherent creepy atmosphere.  (At least from the pictures of collections I've seen on the Internet.  I can only imagine it's worse in person.)

Besides that dolls caught forever in cardboard and plastic shells aren't as much fun to view, some of the boxes actually hurt the dolls they've entombed.  Among other problems, the cardboard isn't acid free, some fabrics have dyes that stain the vinyl of the dolls, sometimes the doll is ited to the box in such a way that it becomes distorted over time.

Among the heroes of doll liberation (and the one with the best website) is Lady Bast, who buys dolls and unboxes them, taking lots of photos along the way.  She includes write-ups on the construction of the dolls themselves, the quality of the clothing, and the quantity and quality of the accessories.  She ends each unboxing by redressing the doll in new clothes.  She's done more than fifty so far, and paging through them made for a fascinating evening.

Another who's done a few is Dorrie Bell.  She has a bunch of doll-clothes patterns and doll insights on her site (which is useful, though it could be more navigable).  I especially liked her unboxing of the Harley Quinn Barbie, which was clearly never supposed to leave its box.  Princess Fiona from the movie Shrek (which I hated) also got unboxed, as did Dori from some straight-to-DVD kids' movie I've never heard of.

I wonder if the doll companies take into account what these collectors want, or if they're not familiar with the movement (or discount them since they're not spending the big bucks).

Categories