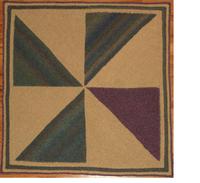
 This blanket came about as part of my Stash Zero initiative.
 I wanted to make something very simple that I could work on when I was out of the house, and I didn't want to have to make a gauge swatch for this project.
My goal was to use color in a way that made it look more than just basic squares sewn together. My SO's mother is a quilter, so I was thinking of her art and toying with various quilt-inspired block designs.
I knew I wanted to knit it, but I didn't want to have to do too much counting. Also, since I was trying to use up stash yarn, I was restricted to what I had on hand. I ended up with a design based on a simple pinwheel block, with one of the pattern triangles a different color, to add visual interest.
The beige is the background color, and it was a deliberate decision to have the beige triangles (instead of the colored, pattern triangles) meet in the middle. It meant that if anything shifted a little when I sewed it together, it wouldn't be as noticeable than if the green and purple points didn't meet exactly right.
Each square was machine knitted in garter stitch (knit every row) from one corner, starting with the beige. I cast on one stitch and increased at the end of each row for 100 rows (until there were 100 stitches on the needle), then worked one row even and changed to the pattern color. In the pattern color, I decreased at the end of each row by knitting two together through the back loops at the end of every row until there are two stitches left on the needle, then bound off.
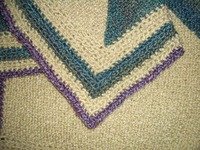
The single-crochet border's design was based on tying the purple in to the whole. Without the purple edge of the border, the purple triangle wouldn't look as if it belonged there. The green stripe in the border was so I could use up as much green as possible. That's also what determined the thickness of the beige stripes in the border. It came out looking exactly right, I'm thrilled to say. I especially like that the heft and weight of the crocheted border match that of the garter-stitched body of the blanket.

The detail picture to the right represents the colors of the yarn much better than the one above of the whole blanket.
This blanket is large (48" square, including the 3 1/2" border) and thick for a baby blanket, but I'm sure I'll find some use for it when it's time. I'm definitely keeping this one for me. It came out better than I thought it would and I'm completely happy with it. That's rare, so I'm enjoying it. And in what may be a first for me:
No new yarn was purchased to complete this project!
Materials:
- Lion Brand Homespun Yarn
- 4 skeins 393 Cream (Color A)
- 3 skeins 320 Regency (Color B) - green
- 1 skein 322 Baroque (Color C) - purple
- No. 10 knitting needles (6.0 mm)
- K crochet hook (6.50 mm)
- blunt yarn needle
- stitch markers (optional)
Using knitting needles and Color A, cast on 1 st.
Increase by k into front and back of last (only) stitch in row.
k1, increase.
k2, increase.
k 100 rows, increasing 1 at the end of every row.
Knit one row even, then change to Color B.
k 98 with Color B, decrease by k2tog into back loops of last two stitches.
k 97, decrease.
k 96, decrease.
When 2 sts are left on needle, bind off knitwise.
Assembly:
Make three squares with Colors A and B.
Make one square with Colors A and C.
Sew squares together in pattern.
Weave in ends at center point.
Edging:
With crochet hook, join Color A anywhere along edge on right side of work.
Round 1 (right side): sc once into edge for every two knitted rows. 3 sc into each corner. (Optional: put marker between first and second stitch of corner.) Join with sl st. Turn.
Round 2 (wrong side): sc in each sc. 3 sc in each corner. Join with sl st. Turn.
Round 3 (rs): Same as Round 2.
Round 4 (ws): Same as Round 2.
Round 5 (rs): sc in each sc. 3 sc in each corner. Join with sl st. Change to Color B. Don't turn.
Round 6 (rs): Same as Round 2.
Round 7 (ws): Same as Round 2.
Round 8 (rs): Same as Round 2.
Round 9 (ws): sc in each sc. 3 sc in each corner. Join with sl st. Change to Color A. Turn.
Round 10 (rs): Same as Round 2.
Round 11 (ws): Same as Round 2.
Round 12 (rs): sc in each sc. 3 sc in each corner. Join with sl st. Change to Color C. Don't turn.
Round 13 (rs): sc in each sc. 3 sc in each corner. Join with sl st. Don't turn.
Round 14 (rs): Same as Round 2. Bind off and weave in all ends.
The free pattern above is for your personal use only.